Purpose
This procedure is used to add or change the details of a ‘Size’ recorded on the system. The use of ‘Sizes’ in the system is optional and can be enabled/disabled via the Product Format function. In fact the very term ‘Size’ is configurable within Online Advantage via the same Product Format definition tool. If ‘Size’ is disabled in your system then there should be no need to create or maintain a list of them in Online Advantage.
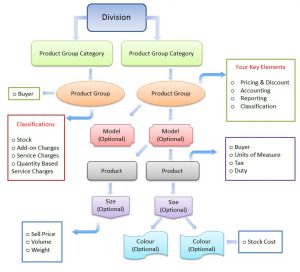
Take a look at the Inventory Schematic for a good visual representation of where Product Sizes sit in the overall Inventory hierarchy.
The Sizes list may be used in conjunction with the Product Details function to uniquely define a product and the size(s) it is available in. If a product has sizes recorded against it, wherever that product is entered, the list of sizes for that product is available for selection. In the system, Costs and Prices are recorded against individual sizes. It should also be noted that if you are using barcodes, then each size on the product requires its own barcode identifier.
Against Product Details you may also define a ‘Selling Unit Conversion’ for a particular size for the Product that is then used in ‘Order Entry’ as an override to the Sales Selling Unit for the Product.
Also in Product Details , you can define Manufacturing Repacks by Size. These are for use when you manufacture a product in some ‘bulk’ size (or form), and then you need to re-pack it from that ‘bulk’ form into smaller size units like e.g. from a mixing “Vat” into individual ‘Cans’, ‘Tubs’, ‘Pails’ or ‘Tins’.
Data Input
Step 1 – Size Code
Size
Enter a new, unique Product Size Code – up to five characters, that does not already exist on the system. You may also select an existing product size for editing and adjustment.
For details on the use of “codes”, see The Role of “Codes” in Online Advantage
When choosing size codes, consider how you would like the sizes to be sequenced/sorted. Note that numeric codes will be sorted before alphabetic codes.
Return to the Top
Step 2 – Details
Size Name
Enter the description of the size. This is a mandatory field.
The maximum number of characters you can enter here is defined when your Online Advantage system is first installed via the Product Format settings.
For more details on descriptions, see The Role of “Names & Descriptions” in Online Advantage.
Discontinued
![]() Select this option if you want to tag this size as no longer in use. When this option is selected, the size may not be entered against a new or existing Product. You may choose to set a size to discontinued rather than delete it so that you can view past history for the size or use it as a selection criteria for reporting.
Select this option if you want to tag this size as no longer in use. When this option is selected, the size may not be entered against a new or existing Product. You may choose to set a size to discontinued rather than delete it so that you can view past history for the size or use it as a selection criteria for reporting.
Sort Sequence
![]() Sort sequence is provided as an alternative way to sorting sizes by size ‘code’ or ‘name’. This can be useful when size codes or names are a mix of alpha and numeric characters and won’t sort the way you want them to. For example, when sorting clothing sizes, sorting by code, name or sort sequence can have 3 different outcomes depending on your naming conventions:
Sort sequence is provided as an alternative way to sorting sizes by size ‘code’ or ‘name’. This can be useful when size codes or names are a mix of alpha and numeric characters and won’t sort the way you want them to. For example, when sorting clothing sizes, sorting by code, name or sort sequence can have 3 different outcomes depending on your naming conventions:
By Code             By Description         By Sort Sequence
08  Small (8)       10  #10                08    Small (8)
10  #10             12  #12                10    #10
12  #12             14  #14                12    #12
14  #14             16  #16                14    #14
16  #16             18  #18                16    #16
18  #18             2XL 2XL                18    #18
2XL 2XL             3XL 3XL                XL    Extra Large
3XL 3XL             XL  Extra Large        2XL   2XL
XL  Extra Large     08  Small (8)          3XL   3XL
