Purpose
Order Entry is the main creation and adjustment function in the Order Management system. It is the primary method used to add or edit Customer Sales Orders, internal Stock Transfer Orders, Customer Quotes and Draft Sales Orders. It also allows users to convert Quotes to Orders, convert Draft Orders to committed Orders, and build new Stock Transfer Orders based on the replenishment settings held in the Inventory system.
Data Input
Step – Select Type of Order
Before you proceed with any Order Entry activity, you must first nominate the type of entry you wish to perform from the list of available options.
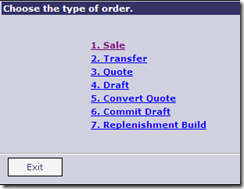
The entry of a new customer order is the most common use of this function but the other options have all been incorporated to allow customer service users to easily swap between the different types available. At any time you can use the “Type” change option at the top of the Order Entry screen to change the activity you are engaged in. Users should note that changing the order type before completion of the current operation means the system will clear any partially entered details.
Sale
Select this option for the entry and adjustment of Customer Sales Orders. Orders created for customers in this function immediately show in other parts of the system in real-time e.g. the Accounts Receivable “Outstanding Value” is adjusted, and credit checking is performed, Inventory commitments are updated so that the “Available Stock” reflects the new position for all items on an order.
Transfer
Select this option to enter or edit internal Stock Transfer Orders. Transfer Orders are a way of moving stock from one stock location (the Issuing or Source Location) to another (the Receiving or Destination Location). Transfer orders can be intra-branch (within) or inter-branch (between). They have their order number automatically prefixed with a ‘T’ to easily distinguish them from customer orders.
Quote
Select the ‘Quote’ option to enter a Quotation for a customer. A quote document can be sent to a customer via print, email or fax format as a way of stating an “agreed” price for the items listed. Quotes have an expiry date which the system calculates but can be adjusted on a quote by quote basis. If a quote is accepted at some later date you can convert it to a sales order using the ‘Convert Quote’ facility. If the Quote is not accepted, it is removed from the system automatically after the set period to retain quotes has expired. See System Options to set the quote retention period. Quotes have their docket number prefixed with a ‘Q’ automatically.
Draft
Select this option to enter a Draft Order for a customer. A draft order lets you enter order details for a customer, that you can either add to later before committing to a sales order, or that you can re-use in a ‘”copy” style approach if the customer is ordering the same items on a regular basis. It can thus become a template for order creation. You may print an Order Confirmation for a draft order, but a draft cannot be picked or invoiced until it is converted to a sales order. Drafts are removed from the system after the set period to retain drafts has expired. See System Options to set the draft retention period. Drafts have their order number prefixed with a ‘D’ automatically.
Convert Quote
This option is only available to users who have the Sales Order Entry ‘New Orders’ option set against their User Details. Select this option to convert an accepted quote into a “committed” sales order.
Commit Draft
This option is only available to users who have the Sales Order Entry ‘New Orders’ option set against their User Details. Select this option to turn a draft order into a “committed” sales order.
Replenishment Build
The “Replenishment Build” option is also only available to users who have the Sales Order Entry ‘New Orders’ option set against their User Details. Select this option to build a Transfer Order from Replenishment details held in the system. Simply enter the Issuing and Receiving Locations, and any inventory items due to be replenished are automatically loaded into a new stock Transfer Order ready for editing and processing as required.
Note that after you have selected an order type at the start of your order entry session, you can change the “Type” at any time by clicking the ‘Order Type’ link. Clicking this link takes you back to the available type options. Note: As previously mentioned, if you change “Type” whilst you are in the middle of entering any order, any data you have keyed in so far is lost.
Additional Payment
This option lets you enter and allocate a payment receipt against a sales order – even if it has gone through to the picking stage of the ordering process. This can be useful in situations where the customer has paid a deposit when the order is entered, and pays the remainder when the order is collected.
Step 1 – Order Number
An existing Order Number can be selected for editing from here, or a new Order Number can be created. The default is ‘N’ for a new order.
For new orders, you can either enter your own Order Number (if you are using numbers from some other source like a docket book), or you can enter ‘N’ to have the system assign the next available order number. When assigning the next available number, the order number will include any prefix defined for the user. See Document Prefixes for more details. The assigned order number is displayed at the end of Order Entry after the details have been submitted.
Note that in this function the term “Order Number” generically covers a number of ‘docket’ numbers including Transfer Order Number, Quote Number and Draft Order Number. There are a couple of options that can be taken at this prompt that will let you copy an existing docket’s details into a new order as follows:
Base on an Existing Order
Enter the Order Number to copy in the ‘Search For’ box and click Search. Then click on the “Copy” icon to select that Order. (If you already see the order you want to copy in your list of recent orders, then just click the “Copy” icon from that list – no need to search ). This feature is extremely useful for multi-delivery orders, where one order can be entered into the system and then duplicated several times. Then only specific details such as date required, delivery address and delivery instructions might need to be changed on each order. You can add or change any of the details of the duplicated order before submitting the new order, including line item price and order quantities. ![]()
Note: You can copy an order that is being picked, and you can copy a credit note to a new order. If you are copying a credit note, be aware the prices copy as negative values.
Base on a Previous Invoice
To base your order on an invoice, tick the ‘base order on a previous invoice’ box and click Next. You are then asked to enter the invoice number to copy. This is useful when a customer says ‘just send me what I ordered last time’. You can change or add any of the copied details from the original invoice before submitting the new order.
Video Demo of base an order on a previous invoice ![]()
Convert Quote
If you want to convert a Quote into a Sales Order, use the ‘Order Number’ prompt to enter the new sales order number (or leave it set to ‘Next’ to have the next order number allocated), and enter the quote number at the ‘Search For’ prompt so you can see/select it. If you don’t know the quote number, you can do a search for it using the filters available. As a minimum you can list all quotes using the filter ‘Order Type’ equals ‘Q’ or by searching for all order numbers starting with the letter “Q”.
Click the “Copy” icon next to the quote number you want to convert. That will copy the quote details into the new sales order for editing. You may receive a warning message if the quote has previously been converted to an order. You can override this message by clicking the “Copy” icon again. You can change or add any of the details on the converted order before submitting the new order. Delivery date is one field that should be updated.
Video Demo of Quote to Order conversion ![]()
Commit Draft
If you are committing a draft order to a sales order, then the Order Number is the new sales order number, and you must enter the draft order number in the ‘Search For’ box. If you don’t know the draft order number, you can do a search for all items with an Order Type of ‘D’. Click the “Copy” icon next to the draft order number to copy the draft order details into the new sales order. You can change or add any of the details of the new order before submitting it.
Transfer Orders
If you are creating a new transfer order, you can only copy another transfer order type – you can’t copy a customer order (and vice versa). Use the ‘Copy’ icon as per instructions above to base an Order on an existing Order.
Return to the Top
Step 2 – Receipt Location
This step is only available when you are entering Transfer orders, either by choosing the ‘Transfer’ or ‘Replenishment Build’ options at the start of the order entry process.
Receipt Location
Enter the destination Location where the stock will move to once the transfer order is despatched. The order’s default delivery instructions, delivery address, delivery code and back order flag are all retrieved from the Receiving Location’s details.
Issue Location
Enter the Location from which the products on this order are to be supplied. Your user’s default stock location is automatically populated here as the issuing stock locaton to save data entry time.
Return to the Top
Step 2 – Customer
This step is only available when you are entering a Customer docket i.e. Sales Order, Quote or Draft Order ‘Types’. For an existing order, you may edit the customer details. For a new order, select the customer who requires the order.
Customer Code
Enter an existing customer code to identify who the order is for.
An on-line credit check is performed as soon as the customer number is entered. If the customer fails this credit check, the following warning message is displayed: “Warning !! This customer has failed credit stop.” The credit check at this point is optional. You can switch it off by un-ticking the ‘Credit Stopped Orders’ option in User Details. (If the option is switched off, credit checking is still performed at the end of order entry when the order is submitted).
After selecting the customer, some details are defaulted onto the sales order from the Customer’s details. Details include the Customer’s Tax Certificate Number, Default Issue Location, Currency, Delivery Address, Delivery Area, Delivery Instructions, Picking Code, Market Segment and Sales Rep. These details can be changed if required.
If there is no existing customer in the system you can click the ‘New Customer’ button to create a customer on the fly. When creating a new customer you are asked for the name, postal address and contact details. There are certain defaults that need to be set up before creating customers on the fly in order entry. Click here for information. Note: You only see the ‘New Customer’ option if your user details are set with a default branch, and that branch has new customer defaults set up already and if you have not been explicitly disallowed from entering new customers on the fly.
If most of your sales orders are for the same customer (e.g. in a point of sale or counter sales type situation you might have a generic ‘cash’ customer), then you can set a default customer on your user details. The customer prompt then defaults to that customer on all new orders.
Change of Customer Checks
If you change a customer here an additional step in the entry procedure appears, asking you to verify which customer the order details are to be obtained from i.e. the original customer or the customer newly entered. These checks are necessary when the defaults from the original customer have already been loaded into the order. For instance the Sale Rep might be different between the old and the new customer. The new customer may also have different price settings from the original – so you are also given the option to check and recalculate prices on the docket, assuming you have already entered line item details on the order. All the details are listed side by side so you can choose which of the two sets of details you want to use on the order.
Tax Certificate No
Enter a tax certificate number for the order if required. This number defaults from the customer’s details if present. Orders with a tax exemption certificate are exempt from any ‘normal’ tax calculated on the line items. If you enter a different tax certificate number to the one stored on the customer’s details, you are given an option to update the customer details with the new certificate number for use on subsequent orders.
Issue Location
Enter the Stock Location from which the products on this order are to be supplied/sourced. The Issue Location may default from either the Customer’s ‘Default Location’ setting or from the User’s ‘Default Location’ in that order of preference. The location used will determine how the system will derive the cost of the sale and where to hold the inventory stock commitments and stock transactions relating to the transaction.
Currency
Select a Currency where you want to use/show pricing on the docket in a currency other than local currency. The currency will default to the currency held against the Customer’s details, if there is one. If you choose a currency other than local currency you need to enter the exchange rate to use for the docket. The exchange rate will default to the current system rate for the currency selected held in the system at the time.
Delivery Address
The delivery address for the customer is displayed here for verification. You cannot change the delivery address at this step, but you can adjust it later in the Delivery Details entry screen.
Return to the Top
Step 2a- Delivery Option
If you are making deliveries at a flat rate to a Postcode or geographical Area, you can switch on the ‘Delivery Calculator’ for Sales Order Entry in System Options.
Select the Carrier making the delivery – this could be a ‘pickup’ carrier for no delivery charge, a carrier that represents your own truck, or a 3rd party carrier.
Choose or enter the delivery address, and, based on the postcode, the delivery charge is derived from the list of delivery charges set up for the carrier from the issuing location.
The delivery charge is added to the order as a line item against the product code specified for order delivery charges.
Carrier
Choose the Carrier that is making the delivery. This may be a ‘pick up’ carrier, a carrier that represents one of your own vehicles or a 3rd party carrier.
If the carrier is designated as ‘pick up’, delivery address input and delivery charge is not required/calculated.
No. of trucks
This is a multiplying factor to use on the delivery charge derived for the postcode. If you are using your own vehicles for delivery and a load requires multiple deliveries with the same delivery charge per delivery, enter the number of vehicles required to make the delivery. e.g. a delivery to the North Shore is $50, 2 trucks are required – total delivery charge is 2 x $50.
Alternate Delivery Address
Where a customer has multiple delivery addresses available, you may select the delivery address this particular order is to be delivered to. On selecting an alternate delivery address, the order delivery address details are filled.
Delivery Address
This is the order delivery address. This defaults from the Customer Delivery Address if present, or the Customer’s Postal Address if there is no delivery address. The postcode is the information used to derive the delivery charge.
Delivery Charge
This is the fee to charge for delivery. It is calculated based on the carrier and either the area or postcode. Remember that an individual customer delivery address can have a fixed ‘contract’ delivery fee set per customer.
Step 3 – Sale Item
Orders are made up of one or more “Sales Items” or “Line items” which are usually the list of products and services/charges involved in the transaction. The system supports the use of a number of different line item “Types”. To add a new ‘Sale Item’ to an order, choose the type of item you want to add. Note that whilst in a given line item type, if you select a product that reflects a different type the system will automatically adjust for you e.g. if you are entering “Add-On Charges” and you enter an stocked product code, the prompts required will refresh so that all the appropriate information for products may be entered.
If you want to insert a line into an existing list to maintain a specific sequence of line items (perhaps to match a customers Purchase Order), enter the line number your want to insert at before choosing the item type. Also worth noting that clicking on an existing item in the list of sale items will allow you to edit and change details for that item as required.
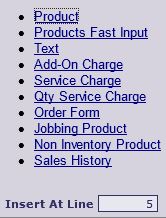
Product
Select the “Product” option to add a ‘normal’ inventory ‘Product’ to your order. For full details on how to add a product via this sale item type, refer to Add Product to a Sales Order
Products Fast Input
Selecting the “Fast Input” option can also be used to to add a ‘normal’ inventory ‘Product’ to the order but via a faster input method with less on-screen options than the ‘Product’ input option. For details, refer Add Products via Fast Input
Notes
Select this option to add a ‘Text’ only line to the order. For details, refer Add Text in Sales Item
Add-On Charge
Select this option to add a value-only ‘Add-On’ charge to the order. For details, refer Add Add-on Charge in Sales Item
Service Charge
Select this option to add a ‘Service Charge’ to the order. For details, refer Add Service Charge in Sales Item
Quantity Service Charge
Select this option to add a quantity based ‘Service Charge’ to the order. For details, refer Add Qty Service Charge in Sales Item
Order Form
Select this option to add items to the order using an existing pre-defined ‘Order Form’ template. For details, refer Add Order Form in Sales Item
Jobbing Product
Select this option to add a Manufactured ‘Jobbing Product’ to the order. For details, refer Add Job Product in Sales Item
Non Inventory Product
Select this option to create a ‘Non Inventory Product’ on the fly and add the new product to the order. For details, refer Add Non Inventory Product in Sales Item
Sales History
Select this option to build order line items based on the customer’s previous ‘Sales History’. For details, refer Build Order from Sales History in Sales Item
Discount
There are two ways to apply discount to the sales order being entered using this tool:
1. Apply a discount % to line items on the order
You can use the discount option to apply a discount percentage to “All items” or only “Non-changed items” on the order. “Non-Changed” items basically means those items that do not already have a change to the ‘standard’ discount already entered against the sale item. Note that items priced under a contract price arrangement will never have the discount applied to them.
2. Apply a discount value to the order as a whole
To apply a discount value to an order, you must have previously set up an add-on product to use as the ‘Discount Product’. This is set up in the Point of Sale Settings function.
Enter the tax inclusive amount of the discount to apply to the order and on confirming the entry, an additional line item is added to the order with the Discount Product and the value of the discount. Note: the discount value line item is recorded as negative to reduce the total value of the order.
You can change the discount value either by editing the line item added or by using the Discount option again later.
Reserve
Tick the ‘Reserve’ check-box to flag that “All Items” on the order are to be reserved for this order. Refer to Add Product to a Sales Order for further details on ‘Reserve’.
Special
Tick the ‘Special’ check-box to flag that “All Items” on the order are to be marked as ‘Special’. Refer to Add Product to a Sales Order for further details on ‘Specials’.
Return to the Top
Step 3 (a) – Price Check
Once all the required ‘Sale Items’ have been entered on the order you may see a ‘Price Check’ step appear depending on the validity of the prices entered for each product. When a product has been entered with a selling price below cost, or below the specified margin % defined for the product, this step appears and you cannot continue until the price discrepancy is validated by an authorised supervisor. A list of users authorised to approve price discrepancies is maintained in System Options.
The authorising user may choose the option to by-pass further price checks on the order if more products need to be added. The ‘by-pass’ is only available for the life time of the order entry procedure. If you save the order and edit details, price checking is performed again. Price discrepancies are reported on the ‘Prices Outside of Margin’ report that is produced as part of the ‘End of Day’ overnight processing. Note that the user who entered the order and the user who authorised the order in the ‘Price Check’ is recorded on the system and for this report. If the user entering the order is also an authorised user, then the price discrepancy is automatically authorised so the ‘Price Check’ step is skipped automatically.
Note: Disabled users can still be used to authorise price overrides. This is allowed so that a “group” override user can be established for several people to use. They can be made aware of the password details and use the disable user for price override authority even though that user can not be used to login to the system.
Return to the Top
Step 4 – Order Details
Refer to Order Details for a full description of the what is available.
Return to the Top
Step 5 – Delivery Details
This step is focused on what you need to record on the order to facilitate the delivery of goods and services to the client. Refer to Delivery Details for a full description of what is available.
Return to the Top
Step 6 – Payments
This step is only available if you have switched on ‘Allow Payment in SOE’ option in System Options or in User Details.
A Bank must also be available – either as the User’s default bank, or the System Options default bank. The ‘Get Bank Details’ button refreshes the available bank if you update the User Details with a bank in the middle of Sales Order Entry.
Enter the method of payment tender and the amount tendered.
For customers with cash terms, the order is not released from credit hold until a payment is entered.
For cash payments, amounts are rounded to the nearest cents.
Choose ‘Deposit’ if the payment is not being made in full.
If a Tender Type method is chosen that has a Surcharge associated to it (e.g. credit card), the surcharge % (and amount) is shown so this information can be relayed to the customer. This allows the customer the option of choosing a different tender method to avoid the additional fees.
If the surcharge is accepted, the total order value is increased by the surcharge value and an additional line item is added to the order for the surcharge fee. The option to Waive Surcharge is available if you do not want to pass the surcharge on to the customer.
You can delete the surcharge from the order to remove the fee at a later point if required.
Return to the Top
Step 6 – Consignments
This step is optional and can be activated in the System Options Order Settings.
See Consignment Details for Order Entry for further information.
Return to the Top
Finish step and further options
Finance
If the order requires finance, click the Finance button to enter the following details:
- Cash Sale Name – this name appears on the Invoice
- Address of the Finance company – this address is used for the Invoice address
- Override Trading Terms – these terms override the standard trading terms configured in System Options/Customer account terms. The terms selected appear on the Invoice
Delete
If you choose to delete a sales order, a confirmation box appears. You may optionally choose a reason for deleting the order. There are reports available to report on the Deleted Orders to enable you to do analysis on why orders get deleted. The End of Day process also produces a deleted order report.
If there are indent Work Orders linked to the Sales Order you are deleting, you are also given the option to delete these at the same time. The Work Orders are only deleted if they have a status indicating that production has ‘not started’. See example below.
Links
After submitting the order, you may see some or all of the following options:
- Release Order From Credit Hold – this option appears if the order has been placed on credit hold and the user has authorisation to release orders from credit hold. Once this option is used, and the order is released from credit hold, further options become available.
- Print Order Confirmation – Use this link to generate an order confirmation docket. This docket may be generated even if the order is on credit hold. However, if the customer credit stop flag is Hold or Unapproved Account, this option does not appear.
- Print Picking Docket – Use this link to generate and print a picking docket for the order. If labels are required the label print option is also invoked with the picking dockets. The option is only available if the order is not on credit hold. Note it can also be disabled for an individual user via an option set against their User Details.
- Print Invoice – Use this link to print an invoice. You do not have to print the picking docket first. This option is only available if the order is not on credit hold or when the Issuing Stock Location is not setup to use Multi-Bin tracking. Note it can also be disabled for an individual user via an option set against their User Details.
- Print Despatch Docket and Invoice – Use this link to print both a Despatch Docket and Invoice for the order. You do not have to print the picking docket first. This option is only available if the order is not on credit hold or when the Issuing Stock Location is not setup to use Multi-Bin tracking. Note it can also be disabled for an individual user via an option set against their User Details.
- View Work Orders Created – this option is shown if Work Orders were created for any non-stock products that are ordered that have no available stock and therefore need to be manufactured. Use this option to view the work order details and to print the work orders if required. Note that Work Orders are not created if the sales order is on Credit Hold.
- Create Purchase Orders – this option is shown if Purchase Orders are required for any non-stock products that are ordered that have no available stock and therefore need to be sourced from Suppliers. Use the option to view the purchase order details and to create the purchase orders. Note that Purchase Orders are not created if the sales order is on Credit Hold.
- Create Transfer Orders – this option is shown if the System Option to create transfer orders from sales order is on. Use this option to create a transfer order on another location to transfer stock in to fill the sales order just entered.
- Enter another Order – this is the default option and is used to take you back to the start to enter a new order.