Purpose
This procedure is used to reconcile statements received from your Bank with the transactions recorded in the Bank Reconciliation system. It may be used at any time. You can either reconcile statements manually, or use auto-reconciliation – where you upload your statement from the bank and have items match automatically.
At the end of the session the procedure allows you to print a report showing details of the statement transactions and (optionally) a report of items remaining on the bank reconciliation file.
Bank Reconciliation is optional within Online Advantage. To turn it on, enable the ‘Bank Reconciliation’ option in System Options. With Bank Rec switched on, each Accounts Receivable (AR) ‘Receipt’ and Accounts Payable (AP) ‘Payment’ is recorded for later reconciliation.
In summary, the function allows a user to enter details from a bank statement and have the system search for matching transactions within the same ‘type’. The transaction types available for reconciliation are as follows:
- Cheque
- Deposit
- Bank Charge or Posting
- Fee
- EFT Payment
- Credit Card
- Periodic Payment
- EFT Receipt
All of these transaction types essentially work the same way. They allow the entry of a reference and amount which will be searched and matched to transactions that have been performed in the various bank related functions in the AP Ledger (e.g. Manual Payment, Foreign Payments, Customer Refunds, Payment Runs) and the AR Ledger (e.g. Cash/EFT Receipts). The concept here is to prove that the transaction on the bank statement has in fact been processed through the appropriate subsidiary ledger.
The exception to this is the “Bank Charge or Posting” function. It allows the user to enter a transaction that has NOT been processed in the ledgers as yet. This function will debit/credit the appropriate General Ledger account for the bank account being reconciled. It will also prompt the user to enter the GL account for the other side of this posting. The user is allowed to enter one or more GL account posting entries as required in order to create an appropriate two-sided balanced posting. Note that typical transactions commonly posted with this facility are essentially things like Bank Charges and Fees, Bank Interest paid/received etc that appear on the statement. This “Posting” facility can also be used to process other transactions that have hit the bank account but have not been accounted for in any of the subsidiary ledgers.
NOTE: Care should be taken when using this manual posting facility as a payment to a Supplier or a payment receipt from a Customer should always be processed through the subsidiary ledger in order for that transaction to be reflected on the Creditors/Debtors account properly.
Data Input
Step 1 – Bank
Bank
Choose an existing Bank which you want to be reconcile. If you are reconciling a bank in a foreign currency, you need to enter the exchange rate to use for calculations in bank charges (for example).
Return to the Top
Step 2 – Statement
You may see a warning message at the top of this page:- “No bank statement format is configured for this bank”. This simply means that the bank isn’t set-up for the uploading of statement transactions electronically from the bank for auto-reconciliation. You can ignore this warning if you are doing a manual reconciliation. If you want to upload transaction data from your bank you will need to record the correct Electronic Statement Format against your Bank.
Statement No
Enter the number of this bank statement (or “reference”), as shown on the statement. This reference will appear on transaction listings that appear in the subsidiary ledger as well as the General Ledger. If you are reconciling one specific Bank statement, then you should use the reference number your Bank has pre-allocated. If you are reconciling several statements at once, or uploading a range of transactions then you should use a reference number that either incorporates the range of statements e.g. 110-115 or a reference that shows the date range e.g. Jan-2012. However it should be noted that the Statement number is not significant in any way. It is purely for information only and lookup use so you can use whatever provides you with the visibility required.
Statement Date
Enter the date the statement was printed, as shown on the statement. When reconciling an individual statement, then the date should be obvious. When performing a “batch” of statements then you can decide if you want to use the start or end date of the batch. The statement date entered will appear on the bank reconciliation audit report and be recorded against the transactions and items reconciled as part of the system audit.
Upload Statement
This option is only available if the bank is set up for auto-reconciliation. If you want to do an auto-reconciliation and upload a bank statement electronically into Online Advantage, select this option. If you want to do a manual reconciliation, leave this option unselected.
Selecting this option assumes you have already downloaded a file containing transaction details from your Bank’s web site or Banking software and that your Bank Account in Online has been associated with the correct Bank Statement format file. This is required because each Bank provides different formats for the downloading of their statement and transaction detail so you must have the correct format selected in order for Online to be able to read the uploaded details and use them for the reconciliation.
If you have chosen to upload statement details then the system will prompt you for the location of the file containing the transaction details. You will need to have access to this file in order to browse to its location so that Online can read the details. After nominating the file, Online will show you the file’s contents allowing confirmation that you have selected the correct file.
You will then see a summary of the upload analysis, breaking the transactions into three sections:
- Fully Matched – transactions found using Amount, Reference, Date and Transaction Type
- Part Matched – transactions where some of Amount, Ref, Date and Transaction Type were found
- Not Matched – transactions that could not be found in the list of outstanding bank transactions
Each of these three sections can be looked at to see the transaction details. The “Part Matched” list allows the user to select and confirm the exact transaction that matches the uploaded details. The items in the “Not Matched” section will need to be edited in the “Manual Reconciliation” step. They will be highlighted in red so that you know which ones they are. Usually these items are those transactions that have not been processed in Online like Bank Charges and Interest.
Note: Uploading statement details is completely optional. The details of a reconciliation can be entered manually. However performing the Bank rec using the upload facility does make the process quicker and more accurate. Should you not find an existing Bank Statement format that matches the output from your banks software, then you should contact Online Advantage Support for assistance on setting one up.
Step 3 – Opening Balance
Opening Balance
Enter the opening balance of the account, as shown on your bank statement. The system allows you to override or correct the Opening Balance figure at the start of each Bank Rec. However if you are doing this then it suggests that previous reconciliation’s have not been completed properly. Assuming the Opening Balance is correct at the start of the reconciliation process, you will be able to see the changing balance of your account as you enter each item for reconciliation, thus allowing you to confirm the transactions are correct as you go by looking at the cumulative or running balance on your bank statement.
Return to the Top
Step 4 – Manual Reconciliation
To begin with, you will not have any transactions listed unless you are uploading details. You should then set about entering each transaction on the Bank Statement by selecting the appropriate Transaction Type from the list of links on the screen. Doing so will then allow you to either select the transaction you want to reconcile, or enter the amount and reference details in order to search for that transaction. Once you select the transaction you are looking for the item will appear on the list.
At the “Manual Reconciliation” step you will have a screen that looks similar to this:

As you select each item for reconciliation the system will return you to the screen above, adding the item reconciled to the list. It will also update the “Current Balance” on screen which is your “Running Balance” as well as allocate the amount selected to the “Debits” or “Credits” figure.
Amounts: Enter the amount of the transaction at this prompt as shown on the bank statement. Credit entries (deposits to the account via Cash or Bank Transfers) must be entered with a preceding minus (-) sign. You can enter this value with up to two decimal places.
If the reference number and the amount you enter matches the amount recorded on the system then the routine automatically reconciles the amounts and goes back to the list of reconciled items and asks you to select another “Transaction Type”.

You may edit and delete transactions as required. Following is an explanation of the specific entry requirement for each transaction type.
Option: Cheque
The details of the cheque and amount are displayed. You may search for a particular cheque number or amount, by entering the details and click Find. Select the required cheque by clicking on the item.
Option: Deposit
The details of the deposit and amount are displayed. You may search for a particular deposit, by entering the amount and click Find. Deposits are entered as a negative amount. Select the required deposit by clicking on the item.
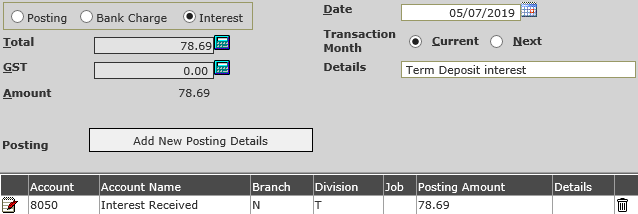
Option: Bank Charge or Posting
If you have transactions to reconcile that are not in Online, and you want to process them directly into the system and post the details to an appropriate GL account you can do so with the “Bank Charges or Postings” function. For instance if there are bank charges or fees on the bank statement that have not already been processed through Manual Payments, you can enter the details via this ‘Transaction Type’. You will need to enter the necessary details as if doing a sundry payment. The screen will looks like this:
 NOTE: In order to use the Automatic “Bank Charge” and “Interest” posting options each Bank Account must be setup with the appropriate GL code to use for this posting. You should also note that by default the system does NOT calculate “Tax” on these postings so if tax is applicable it will need to be adjusted manually.
Select the type of charge: Posting, Bank Charge or Interest.
Choose ‘Bank Charge’ if you have set up a default bank charge GL account on the bank. That default account loads into the Posting details at this step, so you only have to enter the amount and details.
Chose ‘Interest’ if you have set up a default interest GL account on the bank. That default account loads into the Posting details at this step, so you only have to enter the amount and details.
Select ‘Posting’ to key in the GL account details. There is no default account loaded in for you with the Posting option.
Note: The Bank Charge or Interest default accounts don’t load until the amount is entered.
Total
Enter the transaction total amount. For banks in foreign currency, the Total is display only and shows the local value based on the exchange rate entered previously. You can enter the total foreign value of the charge in the Currency Value field. You can override the default exchange rate if required.
Tax
The amount of tax is calculated at the standard tax rate and defaults. You can override this amount if required to match the tax on a transaction or to set it to zero where tax does not apply.
Amount
Displays the total transaction amount. (Total less tax).
Date
Enter the date of the charge. The current system date is defaulted.
Transaction Month
Select the transaction month: Current or Next. For further details on transaction month, click here.
Details
Enter the details of the transaction.
Posting
If you wish to add new posting details, click the Add New Posting Details button. Select whether you wish to perform General Ledger or Job Costing posting. For full details on entering a Posting, click here.
Option: Fee
The details of the fee and amount are displayed. You may search for a particular fee, by entering the amount and click Find. Select the required fee by clicking on the item.
Option: EFT Payment
The details of the bank transfer and amount are displayed. You may search for a particular bank transfer, by entering the amount and click Find. Select the required bank transfer by clicking on the item.
Option: Credit Card
The details of the credit card transaction and amount are displayed. You may search for a particular reconciliation code or amount, by entering the details and click Find. Select the required credit card transaction by clicking on the item.
Option: Periodic Payment
The details of the payment and amount are displayed. You may search for a particular payment, by entering the amount and click Find. Select the required payment by clicking on the item.
Option: EFT Receipt
The details of the transfer receipts and amount are displayed. You may search for a particular transfer receipt, by entering the amount and click Find. Select the required transfer receipt by clicking on the item.
Processing the Statement
If the amount entered from a statement cannot be reconciled with the amounts of the transactions on the Bank Reconciliation file for the item, the statement amount can be left on the reconciliation file as a “variance” and reconciled at a later time.
Similarly, if there are no transactions recorded in the bank reconciliation file for a particular statement reference number, the statement amount can be left on the reconciliation file as an “unmatched” item and reconciled at a later date.
Return to the Top
Step 5 – Finishing and Reporting
At the completion of a Bank Statement the “Current Balance” on the screen should equal the “Closing Balance” on your bank statement. If it does not then you have either missed a transaction or made a mistake matching the transaction details.
Click Submit to commit the details or go back to the Manual Reconciliation step to make any adjustments.
After submit you are presented with 3 options:
- View items reconciled
- View the current Bank Reconciliation Details
- Reconcile another Bank Statement
View Items Reconciled
This option prints the ‘Bank Transactions Cleared’ report which shows you the items just entered in bank reconciliation. You are presented with a list of items in a View and Omit selection screen. You can de-select any items you don’t want to include in the report. For example, you may have entered the reconciliation for several banks, and only want to choose items for one of those banks. The report can only be run once – after you use the ‘View Items Reconciled’ option, the link is removed. You can choose to run the ‘Bank Transactions Cleared’ report from the menu at a later time if you wish – you don’t need to click this option. This report is designed to print items that have not previously been printed and as such, it can only be run once. If you do have a need to re-print the report, you can use the ‘Bank Transaction Cleared History’ report. It is recommended this report be saved for future reference.
View the Current Bank Reconciliation Details
This option launches the ‘Bank Reconciliation Details’ report. This report shows you what transactions are still outstanding (unreconciled) in the Bank Reconciliation file. You do not have to click this option here. This report is available on the Reports menu to run at any time. This report is also printed at the time of running Accounts Payable end of month.
Reconcile Another Bank Statement.
Select this option to return to the first step, where you can choose to reconcile another bank.
Return to the Top