Purpose
This procedure is used to enter or modify the details of despatch dockets that were issued manually. Details of these despatch dockets must be entered before an invoice can be produced for the delivery. Typically this function is used for the “post processing” of a delivery docket that has already been manually completed.
Data Input
Step – Select Type of Order
Before you proceed with Manual Despatch Docket Entry, you must first nominate the type of entry you wish to perform from the list of available options.
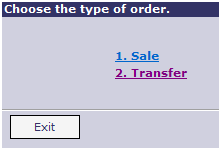
Sale
Select this option to enter a manual Customer Sales order docket.
Transfer
Select this option to enter a manual Stock Transfer order docket used to move inventory from one internal Stock Location (the Issuing Location) to another (the Receiving Location). Transfer orders have their order number prefixed with a “T”.
Step 1 – Order Number
An existing Order Number can be selected for editing from here, or a new Order Number can be created. The default is ‘N’ for new order.
For new orders, you can either enter your own Order Number (if you are using numbers from some other source like a docket book), or you can enter ‘N’ to have the system assign the next available order number. When assigning the next available number, the order number will include any prefix defined for the user. See Document Prefixes for more details. The assigned order number is displayed at the end of Manual Despatch Entry after the details have been submitted.
Return to the Top
Step 2 – Receipt Location
This step is only available when you are entering Transfer orders.
Receipt Location
Enter the Location where the stock will move to once the transfer order is despatched. The order’s default delivery instructions, delivery address, delivery code and back order flag are all retrieved from the Receiving Location’s details.
Issue Location
Enter the Location from which the products on this order are to be supplied.
Return to the Top
Step 2 – Customer
For an existing order, you may edit the customer details. For a new order, enter the customer who applied for this order.
Customer Code
This step is only available when you are enter a Customer ‘sales’ order. For an existing order, you may edit the customer details. For a new order, select the customer who requires the order.
An on-line credit check is performed as soon as the customer number is entered. If the customer fails this credit check, the following warning message is displayed: “Warning !! This customer has failed credit stop”. Note: A Manual Despatch may produce a picking docket, despatch docket and invoice despite the customer being on credit hold as that is the nature of this “post processing” style function.
After entering the customer code, some details are defaulted into the sales order from the Customer Master details. These fields include the Customer’s Tax Certificate Number, Default Issue Location, Currency, Delivery Address, Delivery Area, Delivery Instructions, Picking Code, Market Segment and Sales Rep. These details can be changed if required. If you change from one customer code to another, you are asked if you want to keep the details loaded from the original customer, or use the details from the new customer. If you change customer codes, the new customer may also have a different pricing matrix from the original – so you are also given the option to check and recalculate prices – assuming you have already entered product details.
If most of your sales orders are for the same customer (e.g. in a point of sale type situation you might have a generic ‘cash’ customer), then you can set a default customer code in your user details. This customer code will then default as the customer in all new sales orders.
Change of Customer Checks
If you change a customer here an additional step in the entry procedure appears asking you to verify which customer the order details are to be obtained from – the original customer or the customer newly entered. These checks are necessary when the defaults from the original customer have already been loaded into the order, plus in the case of pricing the new customer may have a different pricing structure.
Tax Certificate No
The tax certificate number entered on the order is displayed if there is one. You may change it at this point if required, or add/remove it as needed.
Issue Location
Enter the Location from which the products on this order are to be supplied. The Location may default from either the Customer Master Default Location or the User Details Default Location. This location is used to derive the cost of the sale.
Currency
Select Currency. The currency defaults from the Customer Master Currency. If you choose a currency other than local currency you need to enter the exchange rate to use for the order.
Delivery Address
The delivery address for the customer is displayed here for verification. You cannot change the delivery address at this step, but you can adjust it in the Delivery Details step.
Return to the Top
Step 3 – Sale Item
To add a new line to the docket, choose the type of item you want to add. If you want to insert a line into an existing list, enter the line number to insert at before choosing the item type. Click on an existing item in the grid to edit and change details for that line.
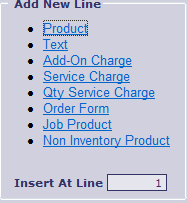
Product
Select the “Product” option to add a ‘normal’ inventory ‘Product’ to your order. For full details on how to add a product via this sale item type, refer to Add Product in Sales Item
Text
Select this option to add a ‘Text’ only line to the order. For details, refer Add Text in Sales Item
Add-On Charge
Select this option to add a value-only ‘Add-On’ charge to the order. For details, refer Add Add-on Charge in Sales Item
Service Charge
Select this option to add a ‘Service Charge’ to the order. For details, refer Add Service Charge in Sales Item
Quantity Service Charge
Select this option to add a quantity based ‘Service Charge’ to the order. For details, refer Add Qty Service Charge in Sales Item
Order Form
Select this option to add items to the order using an existing pre-defined ‘Order Form’ template. For details, refer Add Order Form in Sales Item
Jobbing Product
Select this option to add a Manufactured ‘Jobbing Product’ to the order. For details, refer Add Job Product in Sales Item
Non Inventory Product
Select this option to create a ‘Non Inventory Product’ on the fly and add the new product to the order. For details, refer Add Non Inventory Product in Sales Item
Discount
You can use the discount option to apply a discount percentage to “All items” or only “Non-changed items” on the order. “Non-Changed” items basically means those items that do not already have a change to the ‘standard’ discount already entered against the sale item. Note that items priced under a contract price arrangement will never have the discount applied to them.
Reserve
Tick the ‘Reserve’ check-box to flag that “All Items” on the order are to be reserved for this order. Refer to Add Product to a Sales Order for further details on ‘Reserve’.
Special
Tick the ‘Special’ check-box to flag that “All Items” on the order are to be marked as ‘Special’. Refer to Add Product to a Sales Order for further details on ‘Specials’.
Step 3 (a) – Price Check
Once all the required products have been entered on the order you may see this step appear depending on the validity of the prices entered for each product. When a product has been entered with a selling price below cost, or below the specified margin % defined for the product, this step appears and you cannot continue until the price discrepancy is validated by an authorised supervisor. A list of users authorised to approve price discrepancies is maintained in System Options. The authorising user may choose the option to by-pass further price checks on the order if more products need to be added. (The by-pass is only available for the life time of the order entry procedure. If you save the order and edit details, price checking is performed again.). Price discrepancies are reported on the ‘Prices Outside of Margin’ report that is produced at End of Day. The user who entered the order and the user who authorised the order is recorded for the report. If the user entering the order is also an authorised user, then the price discrepancy is automatically authorised.
Return to the Top
Step 4 – Order Details
Refer to Order Details for a full description of the what is available.
Step 5 – Delivery Details
This step is focused on what you need to record on the order to facilitate the delivery of goods and services to the client. Refer to Delivery Details for a full description of the what is available.
Step 6 – Consignment Details
If you need to produce paperwork for carriers or print detailed labels for packaged items, enter the consignment details here. All the details here are optional so if you have no need to enter consignment details you can continue with the entry process.
For full details on what to enter, see Consignment Details for Order Entry.
Return to the Top
Finish step and links
Finance
If the order requires finance, click the Finance button to enter the following details:
- Cash Sale Name – this name appears on the Invoice
- Address of the Finance company – this address is used for the Invoice address
- Override Trading Terms – these terms override the standard trading terms configured in System Options/Customer account terms. The terms selected appear on the Invoice
Links
After submitting the order, you may see some or all of the following options:
- Print Picking Docket – Use this link to print a Picking Docket for the manual docket. If labels are required the label print option is also invoked with the picking dockets.
- Print Despatch Docket – Use this link to print a Despatch Docket for this order docket. A despatch docket is basically an Invoice without the pricing of the items and the docket value appearing. It is typically used for confirmation of despatch of the items, as driver paperwork and for delivery confirmations.
- Print Invoice – Use this link to print an Invoice. There is no need to print the picking docket again before doing an invoice. Once an order is invoiced it can no longer be changed in the system. Note that this option can also be disabled for a individual user via an option set against their User Details.
- Print Despatch Docket & Invoice – Use this link to print a Despatch Docket and an Invoice at the same time. This option is basically a quicker alternative to using both the ‘Print Despatch Docket’ and ‘Print Invoice’ links above.
- Enter another Docket – this is the default option and is used to take the user back to the start of the function so that they can enter or make adjustments to another docket/order.