Most Online Advantage Inventory transactions require the user to enter a product quantity. The entry of that quantity – and its associated data – can range from simple to complex. The degree of complexity is determined by how your business has decided to configure the system and the individual data elements like Products, Stock Locations, and Inventory items.
Product Units of Measure
Single Unit
 When a product is created with only one unit of measure then the quantity is entered as a “Single Unit” input. This means that the product is being “handled” in the same basic unit of measure for Stock Units, Sales Units and Purchase Units.
With the example shown the product has all the “units” to ‘Each’. So the quantity to enter is the number of “Eaches” required for the transaction.
Two Units
 If a product has a Purchase Unit or Sales Unit that is different to the Stock Unit, then Online Advantage prompts the user with “Two Units” of measure. As shown in the sample the product has a Stock unit of “EA” (Each) and a second unit of “Box”. The 2nd units could be a Purchase Unit or a Sales Unit. Basically the Purchasing system will prompt with Stock and Purchase Units when available, and the Order Management system will prompt with Stock and Sales Units when available. In the sample shown, if we assume it is from the Order Management system, then the sales conversion is 5, which means there are 5 “eaches” in each “box”. You could enter the quantity as either 1 Box, and it will calculate 5 EA for you, or you can enter 10 EA and it will calculate 2 Boxes.
Size Unit
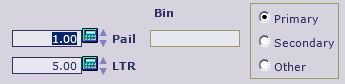 When a product is setup with a list of Sizes that it is stocked/sold in, each Size can have a different conversion that is used to calculate the number of Stock Units. The product in the example shown has Stock units set to “LTR” (Litres) and Sales units set to “LTR”! For this product, the quantity conversion is coming from the conversion for the product’s Size which is Pail. This is usually used for “bulk” or “fluid” items that are sold in varying sizes. This product item could have Sizes like Pail, Drum, Tin etc. Against the Pail size, a selling conversion of 5 LTR is specified – so 1 Pail contains 5 Litres of the bulk material.
Note the up and down arrows next to the quantity input. These can be used to increment or decrement the entered quantity by 1. There is also a calculator tool beside the input. You can click on this, make calculations and hit <enter> to have the result entered into the input space for you.
Bin Details
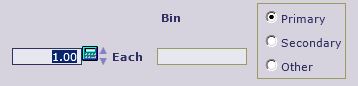
There are 2 types of bin tracking that affect the way quantity input occurs. They are “Optional Bin Tracking” and “Multi Bin Tracking”. For Optional Bin Tracking the bin entry is shown as it is in the examples above for Single Unit, Two Units and Size Unit input. The entry of a bin code is optional. You can nominate whether the bin is to be the Primary bin for the product for the current location, or the Secondary bin, or some Other non-related bin.
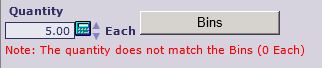
For Multi Bin Tracking, the user will have a button labelled ‘Bins’ as shown in the example. You need to click the button to see the function used for the entry of the Bin details for the transaction. Note the message in red. This means that the sum of the quantity currently entered against the Bins does not match the transaction quantity of 5. To clear this error, you need to click on the Bins button and enter the correct Bin details so that the total quantity recorded per Bin agrees with the transaction quantity.
Tracking Details
The Quantity Input is different and more complex when Products/Inventory items have Tracking turned on. There are 3 basic types of Tracking a product can be set up to use as follows:
- Serial Tracking
- Batch Tracking
- Dual Reference Tracking
Each Tracking method has differences in input method used for the transaction quantity. You will see a differently labelled button depending on what the product tracking is set to as follows:


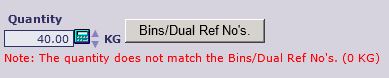 Note that with this example, the Inventory Location is set to Multi Bin Tracking and the Product is set to Dual Reference Tracking, so the button is labeled for both options.
As with the Multi-Bin Tracking entry, the quantity entered in the Tracking Details must total to the transaction quantity entered. For example, if you are moving 3 Serial tracked items in inventory, then you must enter 3 Serial numbers.
Tracking Entry
The example below shows tracking entry for a Dual Referenced item within a Stock Location set to Multi-Bin tracking. You must enter the Bin and Quantity found (or added) at that Bin and add it to the list until the Quantity Recorded matches the Quantity Required (shown on the right).
For the Dual Tracking section, you must enter the Reference and the Quantity, plus how many “complete” and “part units” there are. You can also enter the date received, which defaults to the current system date. Add the reference to the list and keep adding references until the Quantity Recorded matches the Quantity Required. When all entries are complete, click the Save button to return to the main screen.
![]()
The example below shows entry for a Batch Tracked item with Optional Bin Tracking on the Stock Location. Enter the Batch Numbers being issued (or received) and the Quantity for that batch and add to the list. Keep adding batch numbers until the Quantity Recorded matches the Quantity Required (shown on the left). If you are issuing products, then you may toggle from entering batch numbers to selecting batch numbers recorded in the system by clicking the ‘Select References’ button. You can use the “Select References” function to pick from the list of existing Batch Numbers currently recorded against the Inventory item in stock to save having to enter the details manually.
![]()
The sample below shows the input function for a Serial Tracked item with Optional Bin Tracking set at the Stock Location. Enter the Serial numbers being issued (or received). With Serial numbers, the quantity is always assumed to be one. Keep adding Serial numbers until the Quantity Recorded matches the Quantity Required (shown on the left). If you are issuing products, then you may toggle from entering Serial numbers to selecting Serial numbers recorded in the system by clicking the ‘Select References’ button.
![]()
With Tracking entry, there are some minor differences depending on whether you are Issuing products from stock or Receipting products into inventory. For example, when receipting products you can enter the ‘Date Received’. When issuing products you have the option to Select References that are already recorded against the Inventory item being used. Validations on the entry are also handled differently depending on whether issuing or receiving. However in general the principles and method of input is the same across the different methods.