Purpose
The ‘Inventory Master’ function is one of the central control points for setting and changing the behaviour of an individual Inventory item i.e. a given Product (including Colour & Size) in a given Stock Location.
This function is used to add or change the ‘Inventory Master’ details of an Inventory item in order to adjust or control how it behaves within a specific location.
Default Replenishment settings at the Stock Location level provide a starting point of behaviour for all inventory items, however, you can override these default settings on individual inventory items as required by using this function. Other important settings such as Bin Details, Tracking and preferred Suppliers are also maintained via this function.
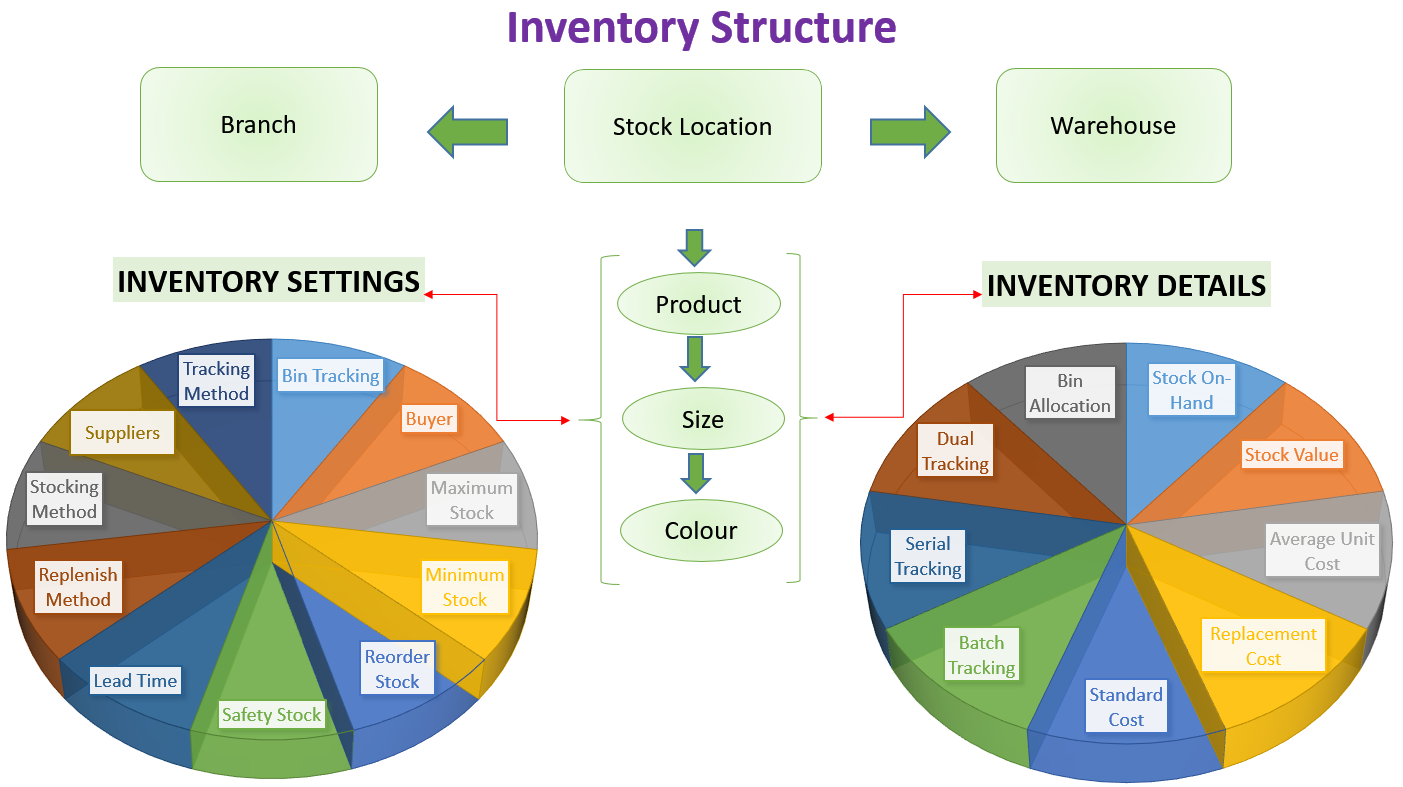 At this Inventory level, additional information is kept such as stock quantity details (e.g. on-hand, on-order, committed, available etc.), stock values (average, standard, replacement costs) and stock replenishment. It is important to realise that you cannot change the stock on hand quantity and stock value details with this function. A separate transaction must be performed to make such changes to maintain ledger balances and an appropriate audit trail.
To get a better view of the details available at the Inventory level, please refer to the schematic provided.
Data Input
Step 1 – Location Code
Location Code
Enter an existing Location Code to nominate the branch & stocking point for which you want to adjust inventory details. The inventory settings held for a specific product at a stock location may be different to those of another stock location. For example, an items ‘Lead Time’ could vary depending on a product’s physical location. Another reason that inventory details are defined per stock location is the replenishment method used. It could be as simple as a different Supplier being used, or more complicated with one stock location using Manufacturing to replenish, whilst another uses internal Stock Transfer to maintain its inventory levels.
Return to the Top
Step 2 – Product
Product
Enter an existing Product Code to choose the inventory item to work on for the stock location already selected. If you have configured the system to use Sizes and Colours, they are also a required entry at this point if they are held against the product you select. Once you have nominated a product, the Inventory details for that item are shown.
Note that if this is the first time Inventory details for the Location/Product/Size and Colour combination have been entered, you have the option to ‘copy’ details from another inventory item using a ‘based on’ feature. In order to copy the details you need to specify the other inventory item you want to copy from with Location/Product/Size/Colour details.
Return to the Top
Step 3 – Replenishment Options
Choose the preferred method of replenishing this product at this stock location. Note that the “default” settings for the Location are displayed and you only need to adjust the settings on a given item if you want them to be different to the default values. In other words the replenishment settings entered in this function override the ‘Location Default’ settings.
Please refer to the Replenishment Overview for further details.
Standard Lead Time
Enter the ‘Standard Lead Time’ to replenish this item, in days. The standard lead time setting is optional. It is used in Inventory Forecasting & Replenishment to determine the time required to source stock. If a ‘Standard Lead Time’ is not entered, the weighted average ‘Lead Time’ for the item is used. This weighted average lead time is an automatic system calculated lead time that is maintained over the life of the inventory item and its replenishment history. If there is no weighted average lead time held for an inventory item (i.e. when the system has not been able to calculate one due to a lack of previous historical transactions) the ‘default’ lead time is taken from the Stock Location details.
Lead Time
The weighted average ‘Lead Time’ is entered in days. This lead time is used in the Stock Analysis report and is kept up to date by the system as goods inwards shipments are received. However the system calculated ‘Lead Time’ may be changed here at any time as required. This lead time is also used as a the default replenishment lead time if a ‘Standard Lead Time’ has not been entered.
Replenishment Code
Select the ‘Replenishment Code’ that defines how you would like inventory levels for this item to be replenished. If left blank, the replenishment settings on the Location are used by default. The location default details are displayed on-screen for your reference.
The ‘Inventory Replenishment Analysis’ checks inventory levels overnight and determines the replenishment action which should be taken, based on the replenishment code that you enter here. Please refer to the Replenishment Overview for further details.
Replenishment Location
For a Replenishment Code of ‘Stock Transfer’, the entry of Replenishment Location here is mandatory. This defines the location from which the current location is to be replenished i.e where the stock will be sent from. The location default details are displayed on-screen for your reference.
Override Stocking Method
Select the override stocking method. If left blank, the Stocking Method set up on the Location is used by default. The location default details are displayed on-screen for your reference. This is an optional field. See the Replenishment Overview for further details.
Override Replenishment Method
Select the override replenishment method. If left blank, the Replenishment Method set up on the Location is used by default. The location default details are displayed on-screen for your reference. This is an optional field. See the Replenishment Overview for further details.
Override Replenishment Mode
Select the override replenishment mode. If left blank, the Replenishment Mode set up on the Location is used by default. The location default details are displayed on-screen for your reference. This is an optional field. See the Replenishment Overview for further details.
Buyer
You can optionally enter an override Buyer for this inventory item here. Default buyers are assigned to product groups and optionally to products, however an overriding buyer may be allocated to a particular inventory item. The Buyer must exist to be entered here.
Note that the override buyer, if specified, is used on the replenishment report. That report lists details by Supplier within each Buyer, and therefore by using this setting an individual item can be moved from one buyer’s section to another without having to move a whole group of products on the report.
Site
The default Manufacturing Site for this item to be made in. The ‘Site’ entered here is used by default for any Manufacturing Work Orders created for this inventory item. For Jobbing products, the ‘Site’ is taken from the Jobbing specification.
Load Centre
As with the ‘site’ setting, the default Manufacturing Load Centre for where this item is made is allocated here. The ‘Load Centre’ (i.e. machine, assembly line etc.) that is entered here is used by default for any Manufacturing Work Orders created for this inventory item. For Jobbing products, the ‘Load Centre’ is taken from the Jobbing specification.
Auto Update?
If ‘Auto Update’ is set to ‘Yes’ then the system allocates an ‘ABC’ classification to the inventory item automatically based on historical activity. If set to ‘No’ then you are telling the system that you will manually set the ABC classification, perhaps because it is a new inventory item. For a new item there is typically not enough history to allow an accurate calculation of the ‘ABC’ classification so you can predetermine the setting manually until such time as you want the system to determine it.
ABC Code
Manually select the ‘ABC’ code to allocate to this inventory item. You may use this prompt to over-ride the system calculated ‘ABC’ code. Note however that if the ‘Auto Update’ settings it ‘Yes’ then your entry here will be overridden the next time the system re-calculates ‘ABC’ settings across all the inventory items.
Tracking Code
You can optionally select what kind of “Inventory Tracking” is required for the product at this Stock Location. Once set for an inventory item in a location, this overrides any tracking setting that may have been entered against the Product Master.
This is an optional entry, so choose ‘No Tracking’ if you do not wish to track products in any of the ways allowed below. The valid tracking methods available are as follows:
- Serial Tracking (in Full)
- Serial Tracking (Issues only)
- Batch Tracking (in Full)
- Batch Tracking (Issues Only)
- Dual Qty Tracking (In Full)
- Dual Qty Tracking (Issues Only)
- Dual Qty Tracking (Non Specific)
For more details on this refer to related topic Inventory Tracking Overview
Shelf Life
Shelf Life represents the time in days that the product is viable for sale/use at this location. For batch tracked items, the date the batch was received + shelf life represents the ‘use by date’. Shelf life can be set at the product level if required. It is available at the inventory level to cater for products whose shelf life is based on storage conditions e.g. refrigeration, temperature etc. At present, the only use of shelf life made within the system is in calculating the use by date in the Stock by Use-by Date report.
Return to the Top
Step 4 – Replenishment Levels
Safety Stock
Enter ‘Safety Stock’ quantity (in stock units), without any decimal places, that is considered to be the ‘safe’ level i.e. the level of physical stock you want to always keep. If the quantity on hand falls below this level, the item is reported on the “Stock Below Safety Level” report. The entry is optional.
Minimum Stock
Enter the ‘Minimum Stock’ quantity (in stock units), without any decimal places, below which replenishment actions should occur. Replenishment actions range from reporting the need to replenish an item, to the automatic creation of a Stock Transfer Order or Manufacturing Work Order, depending on the Replenishment settings of the inventory item. The entry is optional.
Note that your ‘Minimum Stock’ point is compared to your ‘Nett’ stock and NOT to your Stock on Hand quantity during replenishment analysis. Your ‘Nett’ position is calculated by taking into account pending incoming and outgoing stock movements e.g. outgoing Sales Orders, Transfer Orders, Work Orders and incoming Transfer Orders, Purchase Orders and Work Orders. Just how your ‘Nett’ stock position is calculated does depend on the overall system replenishment method selected in the Replenishment System Options function.
Maximum Stock
Enter the ‘Maximum Stock’ quantity (in stock units), without any decimal places, that represents the maximum quantity that the system should attempt to replenish too. In theory this should be the sum of the current ‘stock on hand’ plus the calculated ‘Reorder Quantity’. The entry is optional.
Minimum Reorder Quantity
An optional setting, the ‘Minimum Reorder Quantity’ is entered in ‘stock units’ without any decimal places. It represents a minimum reorder point under which the system will not attempt to replenish. It is sometimes referred to as an ‘Economic Reorder Point’ because it can be used to set a minimum quantity which you have decided is not economically viable to order below.
Note that for a Manufactured item (Work Order replenishment) the ‘Reorder Quantity’ comes from the specification ‘Batch Size’ so it cannot be edited/changed in this function.
Replenishment Quantity Factor
Another optional entry, the ‘Replenishment Quantity Factor’ is once again entered in whole ‘stock units’. It is used in conjunction with the ‘Replenishment Factor’ to allow the ordering of replenishment of an inventory item in multiples or ‘batch’ quantities.
Replenishment Factor Type
Select the ‘Replenishment Factor Type’ for use with the ‘Replenishment Quantity Factor’ from the list below:
- None – allows for any replenishment order quantity (in whole units) to be recommended
- Multiples – tells the system to only recommend/order in multiples of the ‘Replenishment Quantity Factor’ e.g. if the ‘Quantity Factor’ is set to 200, then the system would calculate an order quantity of 200,400,600,800, etc.
Step 5 – Bin Details
Specific Bin?
This option is similar to using a Bin Tracking‘ code ‘2’ i.e Specific Bin per Product, except that only this inventory item is set to use a specific bin and not a whole Stock Location.
If the Bin Tracking setting for the Stock Location is set to ‘1’ (Optional Bin Tracking) or ‘2’ (Specific Bin per Product), then input is not required.
If the location Bin Tracking is set to ‘3’ (Multiple Bin Tracking) then this flag can be used to make this item use ‘Specific Bin’ tracking. This allows you to have some inventory items using Multiple Bin Tracking and others using Specific Bin Tracking within the one Stock Location at the same time.
Read here for more details on Bin Tracking.
Primary Bin
Stock can be allocated to a ‘Primary Bin’ within a stock location. This ‘Primary Bin’ appears on picking dockets to assist warehouse staff in locating items. The entry and use of bins is different depending on the Bin Tracking option selected for the Stock Location and the Inventory override setting in this function.
Code 1 – No Bin Tracking
Normally bin locations are entered and/or altered in the stock receiving procedures e.g. Shipment Receipts, Manual Stock Receipts. Entry of a Bin in this Inventory details function provides a method of setting or changing the bin without using a stock receiving function. The entry of a bin here is optional. Bins do not need to have been previously established as they will not be validated during entry.
Code 2 – Specific Bin Tracking
The entry of a previously established bin is required here if the ‘Specific Bin’ option is enabled for the stock item.
Code 3 – Multiple Bin Tracking
If ‘Specific Bin’ is set to “Yes” then the entry of a previously established bin is required. The bin entered is used for all the receiving and issuing of this stock product. However if ‘Specific Bin’ is not in use, the entry of a bin is optional. If a bin is entered it acts as the default bin for the inventory item during the entry of multiple bin and quantity details in the stock receiving and issuing functions.
Apply to all Sizes
Tick this option if you would like to update ALL Sizes of the Product (for the selected Colour) with the nominated ‘Primary Bin’. This option is available to save you some data entry time. Note: This option is not visible until switched on in System Options – Inventory settings.
Apply to all Colours
Tick this option if you would like to update ALL Colours of the Product (for the selected Size) with the nominated ‘Primary Bin’. This option is available to save you some data entry time. Note: This option is not visible until the option is switched on in System Options – Inventory settings.
Secondary Bin
‘Secondary Bin’ usually holds stock that the ‘Primary Bin’ is replenished from. In other words, the secondary bin is often used as a ‘bulk bin’. Alternatively is can just be used when the Primary Bin is full and the overflow stock has to be put somewhere. The entry of a ‘Secondary Bin’ is for ‘Optional Bin Tracking’ only.
Normally bin locations are entered and/or altered in the stock receiving procedures. This procedure provides a method of setting or changing the secondary bin without the need to perform a stock receipt. The entry of a bin here is optional. Bin codes do not have to be previously established as they will not be validated.
Override Bin Picking Type
Select the ‘Override Bin Picking Type’ from the list. This overrides the Bin Picking method set at the Stock Location level. For a description of the Bin Picking types, read here.
Override RF Replenishment
Select the ‘Override RF Replenishment’ setting. This overrides the RF Replenishment method set at the Stock Location level.
Other Bins
This shows a list of bins the inventory item was previously stored in – with the exception of the current primary and secondary bins.
There are various options you can choose for how to record the bin history in the Inventory section of the System Options function. Note that the ‘last 5 bins only’ option does not allow you to edit and maintain the list of bins seen here.
This list of bins can be used in stock take, replenishment history and on picking dockets.
When entering stock or purchase receipts, you can designate the bin used as ‘primary’, ‘secondary’ or ‘other’. A bin designated as ‘other’ is added to this list.
Return to the Top
Step 6 – Suppliers
You can enter a list of Suppliers that this item can be purchased from in this Stock Location. Additionally you can rank the Suppliers so that the preferred supplier can be selected from the list by the Replenishment system. When entering a product in purchase order entry, the product is not tied to the preferred supplier, but it does give a warning to the user when a supplier other than the preferred supplier is used. When purchase orders are built automatically, the supplier is selected as follows:
Looks for a Supplier with rank ‘1’ in the inventory details, otherwise:
Looks for a Supplier with rank ‘1’ in the product master details, otherwise:
Looks for the Supplier with the best price out of the list of suppliers in the inventory details, the list of suppliers in the product master details, and any suppliers from whom this product has been previously purchased and a record of the purchase exists in the Supplier Prices details.
Supplier Code
Enter an existing Supplier using its predefined code or by searching for the required supplier.
Supplier Rank
Enter the supplier ranking to create a preferred list. This is an optional input which must be wholly numeric. It is used to prioritise the selection of a supplier where more than one source exists for replenishment. Note that the supplier ranked the highest (i.e. with the lowest rank value e.g. “1”) will be the default supplier used during replenishment analysis.
Return to the Top