Purpose
The ‘Report Launcher’ is the tool from which all reports in OA are run, whether it be to the screen, printer, email, fax or saved to file. The system is written this way to provide a standard, consistent and familiar method to all users who run reports. Also remember that sometimes “reports” can mean “documents” or “forms” such as Purchase Orders, Invoices etc.
Depending on the report selected (i.e. its settings) there are several options that may be presented to the user via the ‘Report Launcher’. These options are explained below:
Filters
Filters are basically “rules” about what data you see when you run a report. We also often refer to them as ‘selection criteria’. They let you choose what data you want to see on your report.
For example, if you wanted a list of customers belonging to a certain rep, you would run a customer report and choose the Rep Code as a filter and the required data to match i.e. a specific Sales Rep. In OA there are 3 types of filters; Fixed, Mandatory and User Filters. Each is explained below.
NOTE: Sometimes a report doesn’t have any filter available. In this case the report is normally a simple one, so the report launcher goes directly to output options.
1. Fixed Filters
Although you don’t see fixed filters when a report is launched, it is worth making a note of their existence here. Fixed filters are often embedded into the report query itself and, as the name suggests, cannot be changed by the user. That’s why they’re Fixed!. These are used on reports to make sure the right data is selected for the report’s specific purpose. For example, on the Orders Failing Credit Check report, there is a fixed filter to make sure that only orders that are on hold are selected.
2. Mandatory Filters
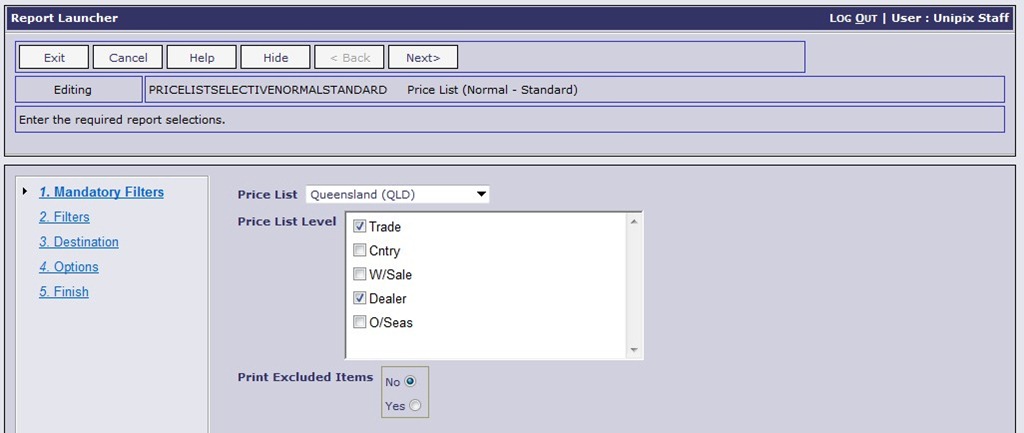 Mandatory filters are selection criteria the user must enter before the report will run. They are required because the report cannot run and still make sense without this mandatory input. An example is for the Detailed General Ledger report where the mandatory filter is the month/year to report on. Not all reports have mandatory filters. If a report doesn’t have any mandatory filters, the Report Launcher goes directly to User Filters, assuming it has any of those.
3. User Filters
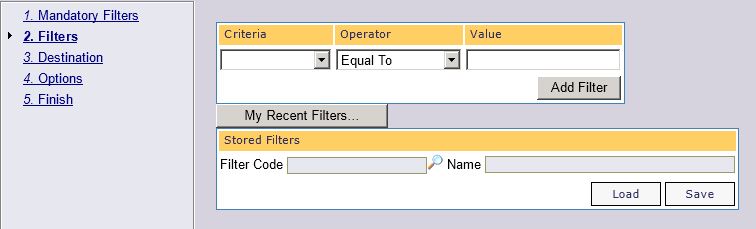 User filters are available so the user can run the report with selection criteria any way they need to. Filter input can range from the very simple to complex. You can enter new filters, choose filters you used recently, store filters for later use, or load previously stored filters.
Lets take a closer look at how to enter filters. 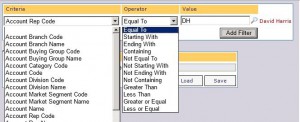
Under the “Criteria” column, select the type of data you would like to filter the report by (e.g. Account Rep). Under the “Operator” column, choose the way you would like to enter the data.
For example, for an exact match choose ‘Equal To’, for a partial match choose ‘Containing’. Then under the “Value” column, enter the data to match. If you only have 1 filter criteria to enter, you can click Next to start running the report. If you have more than 1, click “Add Filter”. New input boxes appear for the next filter.

You will see on this subsequent filter input an extra option for “AND” or “OR”. These are logical operators. Use AND if you want both the first filter and the second filter to be true when selecting the data. Use OR if you want either the first or second filter to be true when selecting the data. A common mistake here is for people to use AND when they should use OR. For example, you can’t run a Sales Order report with Order Number = 123 AND Order Number = 124 – it’s logically not possible for an Order Number to be both 123 and 124, so the correct filter is with Order Number = 123 OR Order Number = 124.
Once you’ve entered your filters, you can edit them, delete them or clear them and start again. You can also group filters to make more powerful selections. Think of grouping like brackets in math computations – items inside the brackets are processed first. At the top of the filter edit area are the grouping icons. Use the check-box to mark the filters that you want to group, and click the “Group Filters” icon.

For convenience, the “My Recent Filters” button lets you choose from the last 10 filters you used when reporting on a particular file. For example, if you entered a filter for the Aged Trial Balance report (which works on the Customer file) and then ran a Customer Account Details report (which also works on the Customer file), the filter you used on the Aged Trial Balance report would also be available via the “My Recent Filters” button on the Customer Account report.
Only the last 10 filters are stored for use by the “My Recent Filters” button. For a safer, more permanent method of saving filters, choose a unique Filter Code and Name for your filter and click the “Save” button. To use a previously stored filter, enter the Filter Code (or search for it via the search function), and click “Load”.
Return to the Top
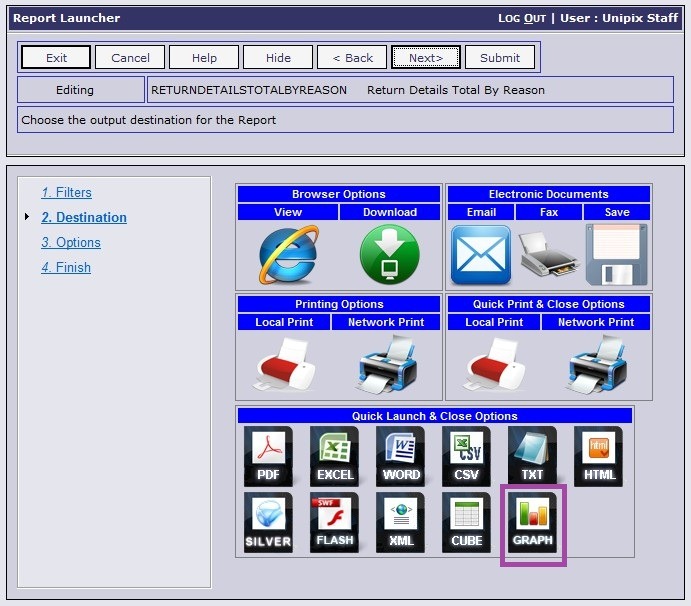
Destination
 Within the Report Launcher we have provided many options for the output destination of reports. Most of the time people want to view reports in the Acrobat PDF Reader format, so if you click the “Submit” button, OA will send the report to the browser in PDF form. There are some reports, like cheques and some other stationery type documents that usually print on a dedicated printer – so you don’t need all these options.
For those reports you can set up Special Forms Queues to allocate a printer. You can read more detail on that here. There may be other reports that have been specifically designed for a certain output format (like Excel) where you also don’t need a lot of options. For these reports you can limit the destination options by restricting the output formats when designing the reports. You can read more about restricted output formats in report design here.
Each of the destination options is explained below.
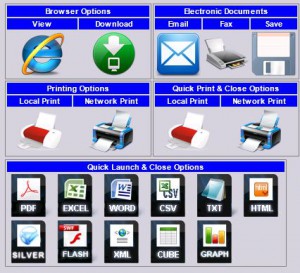
Browser Options
View
View lets you see the report output to your screen. When you click the view icon, you are taken to the Options step where you can choose the report Output Format. The default is Adobe PDF format, but you can also choose Excel, Word, plain text, XML or others as required. There is a full list of Output Formats at the end of this document.
When you are ready to run the report, you can either click Submit or the Launch button. The Submit button will launch the report and close the Report Launcher. The Launch button will fire off the report in a new window, but keep the Report Launcher open. This allows you to go back to the Report Launcher and adjust filters or change the Destination or Output Format and re-run the report.
Download
Download lets you download the report to your PC or network storage so you can open or save the report later as required.
As with the ‘View’ option above, you have the same Output Format choices, and the same behaviour for the Submit and Launch buttons.
Electronic Documents
Email allows you to send the report as an email attachment. When you click the email icon, you are taken to the email Options step where you can choose the Output Format of the report and compose the email message. Next to the email addresses (To, CC and BCC) there are some ‘Me’ buttons. Click these to fill the email address with your own email address. Click the “Find Email Addresses” button to find and use email addresses from the Contacts database. You can search for a particular Contact, Supplier, Customer or User.
Tick the ‘Mail Delivery Notification’ check-box if you want to receive a notification that the email was delivered. We are often asked about whether an email has been received. However with current mail server technology it is not possible to be certain that an email reaches the “InBox” of the recipient(s). However the ‘Mail Delivery Notification’ does allow you to be certain that the recipients mail server has received your email. Unfortunately not all email servers support the sending of these delivery notifications, but most do. Once an email is delivered to their mail server, it is then left up to their internal mail server rules as to if and when the email is delivered. It is not uncommon for a perfectly legitimate email to be prevented from reaching the intended mail-box of the recipient due to Junk & Spam Filters on mail servers. All these factors are outside of the control of Online Advantage.
![]() Usually a report sends as an email attachment. You may include additional attachments to the email by using the ‘Attachments’ link. Clicking this link shows a list of available attachments that have been uploaded previously to your server. These may include things such as Terms & Conditions or Warranty or Service information. You may select multiple attachments.
Usually a report sends as an email attachment. You may include additional attachments to the email by using the ‘Attachments’ link. Clicking this link shows a list of available attachments that have been uploaded previously to your server. These may include things such as Terms & Conditions or Warranty or Service information. You may select multiple attachments.
![]() As an alternative to attaching a report to an email, you can now ’embed’ the report within the body of the email itself. To do this, you must select the ‘HTML’ Output Format. With this selected, the option to “Embed Report within ‘Mail Body’ (HTML only)” becomes available. Select this option to send the email with the report content in the email body instead of as an attachment and then submit or schedule the email in the usual way.
As an alternative to attaching a report to an email, you can now ’embed’ the report within the body of the email itself. To do this, you must select the ‘HTML’ Output Format. With this selected, the option to “Embed Report within ‘Mail Body’ (HTML only)” becomes available. Select this option to send the email with the report content in the email body instead of as an attachment and then submit or schedule the email in the usual way.
Note that this “Embeded Report” feature is not suited to large reports, so please use it with some common sense. Also please be aware that at the receiving end, different email client applications (e.g. Outlook, Google etc.) may present the contents slightly differently to each other based on the way they each interpret the HTML formatting.
Clicking the ‘Submit’ and ‘Launch’ buttons will tell the system to process the report for sending via email. Once again, ‘Submit’ will close the Report Launcher, whereas the ‘Launch’ button keeps it open for you to do more with the same report.
There is also an extra ‘Schedule‘ button. This allows you to set up the email to run at a certain time, or you can set it up to run regularly according to a certain schedule. More details on the schedule options can be found here.
Fax
Fax allows you to send the report as a facsimile. When you click the fax icon, you are taken to the fax Options step where you can enter optional fax cover sheet details. Click the “Find Fax Address” option to search for a contact, supplier or customer in the Contacts database so you can retrieve the fax number and address of the contact.
The Submit and Launch buttons submit the fax for processing. The fax is processed via a 3rd party system. Currently we have two options available as follows:
1. Fax send via email
We have an option to pass faxes to a third party faxing service via email. One good example of this is the UTBox offering. In order to use this option you will need to create an account with UTBox and register the email addresses that are allowed to send faxes. We believe this is the preferred method for sending faxes. The success rate for fax delivery is higher than option 2 below, and the user sending the faxes also receives an email if the fax fails.
Additionally UTBox will provide you with a unique fax number for the receipt of faxes. Received faxes are sent to a designated email address of your choosing. This can provide inexpensive faxing sending and receiving if required.
2. Fax sent via ‘ActiveFax‘
For hosted clients faxes will be send from OA to ActiveFax and then transmitted to eFax via a web service for delivery to the fax destination. All eFax call charges will be passed on via your monthly OA hosting invoice.
For self-hosted clients you must have purchased a licence and have ActiveFax installed and configured on your server before faxes can be sent. You will also need an account with eFax for the sending or the fax, or a dedicated fax modem attached to your server.
The “Schedule” button allows you to defer sending faxes, or to set up a regular faxed report. More details on how to schedule reports are available here.
Save
The Save option allows you save the report to a specified folder on the server. NOTE: To save the file to folder on your PC, use the Download option. When you click the Save icon, you are taken to the save Options step where you can specify the folder on the server to save to, the name to save it as, and whether it should overwrite any existing file.
Submit and Launch buttons will run the report and save the output as requested.
The “Schedule” button allows you to defer running the report and saving it, or to set up a regular save. More details on how to schedule reports are available here.
Printing Options
Local Print
If you click on the ‘Local Print’ icon, the report will print to the “Default Windows” printer attached to your PC or workstation. This is only possible if you have installed the Online Client Application Launcher to your local PC. You can read more details about installing that here.
Network Print
If you click on the ‘Network Print’ icon, you are taken to the print Options step. If you have a default printer set up against your user (refer to User Details for more information), then that printer will be the default printer chosen. If you want to use a different printer, un-check the “Print on” check box and the default printer displayed is replaced by a list of printers available on your network. Choose a printer from the list and click either the Submit or Launch buttons.
A word of caution…often you see a “Microsoft XPS Document Writer” or “Fax” printer on the list. Do not choose any of these as your printer because it will not work and will most likely cause problems to the OA application on the server. This is because these types of printer drivers are meant to be “interactive” with the user. However since they are running on a server and you cannot interact with the servers console, they will sit and wait for human input on the console screen forever, or until someone cancels the task. If you see these types of printers available please ask your System Administrator to remove them from the list of available printers.
You can “Schedule” reports to run at a later time, or at a regular time, so that they automatically print to a network printer. More details on how to schedule reports to print are available here.
![]() Don’t see a network printing option? It may be that this option is turned off. Review No Network Printing for more details.
Don’t see a network printing option? It may be that this option is turned off. Review No Network Printing for more details.
Quick Print & Close Options
Local Print
If you click on the ‘Local Print’ icon under this section, the report will print straight to a printer attached to your PC, with no options given to change or check which printer is set, and it will then close the Report Launcher window automatically.
Network Print
If you click on the ‘Network Print’ icon under this section, the report will print directly to the default printer set up against your user, with no options given to verify that printer or change it, and it will then close the Report Launcher window automatically.
Quick Launch & Close Options
All the icons under this section launch the report into the associated report ‘viewer’ for the chosen format. For example, Excel and CSV icons should download the report data directly into Excel. Using any of these icons will also cause the Report Launcher to close once the report has been run.
NOTE: All the “Viewers” described below like Excel and Adobe Acrobat Reader must be installed and ready for the report to be visible. i.e. if you do not have the Adobe Acrobat Reader installed then the OA Report cannot be viewed in that format.
Output Formats
| Option | Document Type |
| Portable Document Format | .PDF – these files can be viewed using the Adobe Acrobat Reader or other PDF file readers most of which are freely available on the internet |
| Excel spread sheet | .XLS – and .XLSX files can be used from Microsoft Excel |
| Word | .RTF – is the ‘standard’ Rich Text Format which can be opened/edited via Microsoft Word, Microsoft WordPad and other readers that support the ‘rtf’ format |
| Comma Separated | .CSV – a comma separated file is extremely ‘light’ containing just the raw data and the “,” character as a delimiter. It is a very useful file format for importing raw data into Excel and other spread sheet applications as it picks up numeric data on import. We consider it the best option data importing for Financial Analysis |
| Tab Separated | .TXT – is similar to CSV but uses the “Tab” character as a delimiter. It is usually opened via Notepad or similar Text Editors but can also be used for importing raw data into Excel and other spread sheet applications |
| Web Viewer | .HTM – or HTML format files are viewed natively by the browser and include some built-in navigation mechanisms for viewing ease |
| Analysis Cube | .CUB – this is essentially an internal OA file format that drives an interactive display tool for analysing data. See details on the Cube Viewer for more information |
| XML Data Set | .XML – the eXtensible Markup Language file format which defines a set of rules for encoding document in a format which is both human-readable and machine-readable. It is mostly used for the exchange of files between computers though |
| Flash Viewer | .SWF – the Small Web Format is another Adobe initiative (like PDF) and has become an internet standard format that ‘Flash Players’ natively read and display. A separate Flash Player add-on is required by the browser to view these |
| Silverlight Report Viewer | The Silverlight Report Viewer is similar in style to the Adobe Acrobat Reader but can be installed from within Online Advantage |
| Graph Viewer | The Graph Viewer is another ‘Silverlight’ based function that lets you convert your report data into charts e.g. column, bar, bubble, area and pie formats |
See also: FAQ: Reporting