Purpose
This procedure is used to add, change and delete the details of a Stock Location.
‘Locations’ are used in conjunction with Products to define and track Inventory Details. The Stock Location typically mirrors your physical warehouse structure, but they can also be used to define sub-sections within a given warehouse i.e. Damaged Stock, Bond/Quarantine Stock, Picking Location, Bulk Store etc. Each ‘Location’ must be set up within a Branch. A Branch can have multiple ‘Locations’ setup with no practical limit to how many you can create.
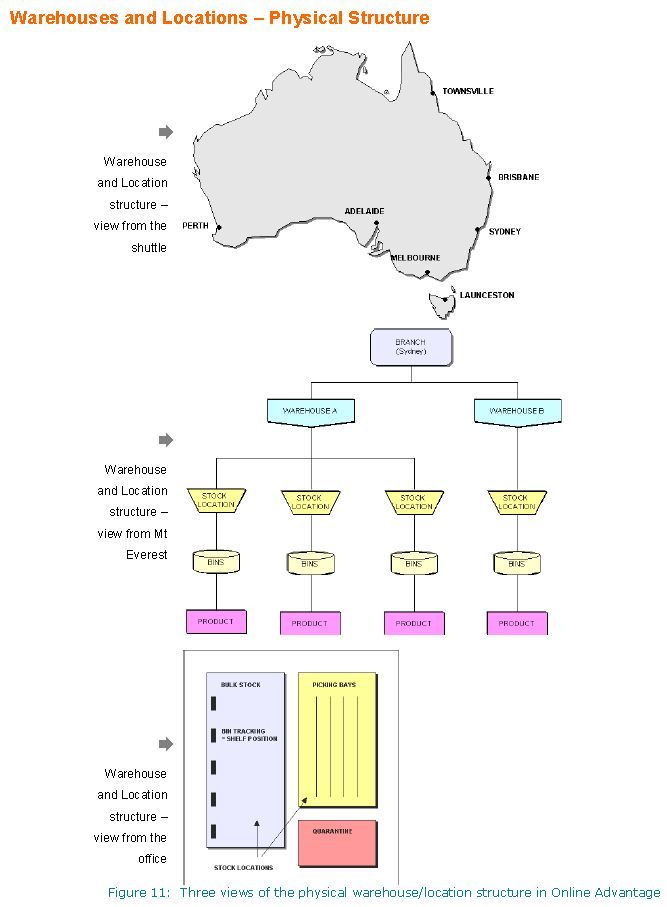 As well as the association with a Branch, each Stock Location is allocated to a Warehouse in this function as part of its details. Note that the structure of the Warehouses and Branches do not need to be the same so you can have different consolidation reporting views.
Since multiple Stock Locations can be set up within each Warehouse, this provides an excellent reporting summary option when you need to consolidate Inventory figures i.e. Stock on Hand, Stock Value. Usage etc.
Data Input
Step 1 – Location Code
Location Code
Enter a new, unique ‘Location Code’ – up to five characters, that does not already exist on the system.
The leading characters of a ‘Location Code’ must include a valid Branch code that is already established in the system. The Branch code part of the ‘Location Code’ is used for ‘Inventory’ related General Ledger postings for transactions that affect General Ledger balances for such ledgers as the Inventory On-Hand Value, Stock/Purchases In Transit, Stock Transfers In-Transit etc.
This can also be the Branch for which sales are credited and cost of sales debited in the General Ledger. Note however that the Location Branch is NOT used in the General Ledger ‘Sales’ postings when the system has been set-up to use the Customer Branch for postings – see the Account Format details for more information on that setting.
You may also select an existing Location for editing or deleting.
For details on the use of “codes”, see The Role of “Codes” in Online Advantage
Return to the Top
Step 2 – Name & Details
Location Name
Enter the description of the Stock Location. This is a mandatory field. The name is shown where you enter a Location in transaction functions, and in Stock displays and Inventory reports.
For more details on descriptions, see The Role of “Names & Descriptions” in Online Advantage
Location Short Name
Enter the short name of the Location – up to 8 characters. This is an optional input. The short name is used on screens/reports where space is limited.
Minor Location
Select ‘Yes’ to exclude this Stock Location from Inventory displays unless indicated. It is simply a way to enable you to focus on the ‘Major’ stock locations rather than seeing every Location available in the system. Especially useful if you have created numerous Stock Locations for ‘Sales Rep’ stock (or ‘car’ stock) and you don’t want them showing on-screen all the time.
Obsolete Location
Select ‘Yes’ to set this Location as obsolete. An ‘Obsolete Location’ is prevented from transactions occurring in the processing functions within the system. More specifically, you may not enter a Sales Order, Transfer Order, Purchase Order, Work Order or Stock Receipt against an obsolete location. You can however move stock out of the obsolete location via Manual Stock Issues or Stock Transfers, or transfer between bins within the location.
Warehouse
Select the ‘Warehouse’ to which this Location belongs. A Warehouse can have any number of Stock Locations allocated to it.
Email Address
![]() Enter an email address for this location. This is used for Electronic Document Delivery (EDD) of Stock Transfer Invoices. When stock is being transferred from this location this email address is the “From” address used by Document Delivery.
Enter an email address for this location. This is used for Electronic Document Delivery (EDD) of Stock Transfer Invoices. When stock is being transferred from this location this email address is the “From” address used by Document Delivery.
You can set up details to be used for the sending email such as subject and body using Standard Stationery Messages.
Email Transfer Invoice
![]() Enable this option if this location should receive Stock Transfer Invoices via Electronic Document Delivery (EDD). The email address recorded on the location will be used as the “To” address for all emails where this location is the receiving location on a Stock Transfer.
Enable this option if this location should receive Stock Transfer Invoices via Electronic Document Delivery (EDD). The email address recorded on the location will be used as the “To” address for all emails where this location is the receiving location on a Stock Transfer.
Location Address
This is an optional entry. The address you enter here is used as the delivery address shown on Transfer Order and Purchase Order documents being received in this Stock Location when no delivery address has been entered on the order.
Delivery Instructions
Enter ‘Delivery Instructions’ associated with this Stock Location, if any. This is an optional entry. The delivery instructions you enter here are used on any Stock Transfer Orders for this Location. They appear on Stock Transfer Order packing slips and despatch dockets.
Delivery Area
Select the Delivery Area for this Location. This Delivery Area is used as a default during Stock Transfer Order entry for each transfer order created for this Location. Note that you can override the Delivery Area allocated on each Transfer Order if required.
Direct Delivery
Select ‘Direct Delivery’ as ‘Yes’ if you want stock to be automatically received into this Location when a Stock Transfer Order is despatched & invoiced from another Stock Location. If ‘Direct Delivery’ is set to ‘No’, then the Transfer Receipt function must be used to receive inventory into stock manually in order to finalise the transfer of inventory. Note that you can override the ‘Direct Delivery’ setting on each Transfer Order if required.
Bin Tracking
Select the ‘Bin Tracking’ option required for the Inventory in this Stock Location. There are three ‘Bin Tracking’ options available as follows:
- Optional Bin Tracking
- Specific Bin Per Product
- Multiple Bin Tracking
Read here for details on these Bin Tracking options. Note when changing from Option Bin Tracking to Multi Bin Tracking, the system will automatically record the current stock on hand as being in the current primary bin recorded on each inventory item.
Price List
Select the ‘Price List‘ associated with this Stock Location. This is an optional entry. If no ‘Price List‘ is selected, the system’s ‘Default’ will be used. The selection of a ‘Price List‘ is an important setting for a Location. It is used to specify where the costs for inventory items in this location are stored and retrieved from.
Bin Options
The ‘Bin Options’ step is only available when ‘Bin Tracking’ for the Location is set to ‘Multi-bin tracking’. Details below:
Default Bin Picking Type
Select the ‘Default Bin Picking Type’ for the Stock Location. For a description of the Bin picking types, read here.
Default RF Replenishment
Select whether you wish to set the ‘Default RF Replenishment’ to ‘Yes’ or ‘No’.
Return to the Top
Step 3 – Replenishment
Default Replenishment
Select the ‘Default Replenishment’ type to be used for the Inventory in this Stock Location. See the Replenishment Overview for further details about each replenishment type available. This default is used where an inventory item in this Location does not have its own replenishment settings. If, for example, most of the inventory items in this Stock Location are replenished via external supplier purchases, the ‘Default Replenishment’ to use would be ‘Outside Supplier’. This way only the inventory items in the Stock Location which are not replenished via outside supplier purchases would need to have a different replenishment type specifically set at the Inventory Details level.
Default Replenishment Location
Select the ‘Default Replenishment Location’ from which the current Stock Location is to be replenished. This is only required for certain Replenishment types e.g. Stock Transfer. For example, if you are replenishing this Location by transferring stock from another internal Stock Location (for example, a ‘Central’ bulk warehouse), then you must specify that Location here.
Default Lead Time
Enter the number of days required to replenish this Location. A maximum of three digits can be entered here. This information is rarely used and is provided merely to allow the Manufacturing scheduling procedure to continue even though no other information is available on lead times. For precise control of inventory, it is important to enter accurate lead times for each individual Product at each Stock Location.
Default Site
Select the ‘Default Site‘ to be used by the Manufacturing system to allocate the factory/site/plant ‘normally’ used to manufacture items for the replenishment of inventory in this Stock Location.
Default Load Centre
Select the ‘Default Load Centre‘ to be used by the Manufacturing system to allocate the machine/process/fabrication line ‘normally’ used to manufacture items for the replenishment of inventory in this Stock Location.
Picking Method
Select the default ‘Picking Method‘ for this Location. This Picking Method is used as a default on new Sales Orders and Stock Transfer Orders entered via Order Entry. You can override the Picking Method on an Order if required. Refer to Picking Methods for a full description.
Stocking Method
Select the default ‘Stocking Method’ to be used by default for this Stock Location. Refer to the Replenishment Overview for further details.
Replenishment Method
Select the ‘Replenishment Method’ to be used by default for this Location. Refer to the Replenishment Overview for further details.
Replenishment Mode
Select the ‘Replenishment Mode’ to be used by default for this Location. Refer to the Replenishment Overview for further details.
Separate Order Per Customer Order
Select whether to create a ‘Separate Order Per Customer Order’ during the processing of Transfer Orders in the Order Management module.
This flag is employed in conjunction with Transfer Orders. The selection here is an override to the system-wide setting. This Location based setting instructs the Stock Transfer Back Order picking routines to create a separate Stock Transfer Order for every individual ‘original’ order number on Back Order when attempting to supply those back orders. Set this option to the opposite of the system-wide setting if you want to override the standard system behaviour for this Stock Location.
Return to the Top
Step 4 – Transfer Pricing
‘Transfer Pricing’ can be used to set and control the ‘value’ which Stock Transfer Orders leave this Stock Location. It permits you to define a contribution (or profit) that will be realised when goods are transferred from this Location to any of the other Stock Locations available on the system. In essence, it allows the definition of an ‘internal’ price for Stock Transfers.
The difference between the carrying costs of the transferred goods and the transfer price of those goods will be reflected in the ‘Gross Profit’ in the Profit and Loss statement. The contribution realised may be defined in terms of a margin percentage or you may chose to apply a ‘selling’ price from the pricing system. In the latter case, you must select a valid Price List and Price Level combination to define the value at which the goods will be transferred between this Location other Stock Locations.
Transfer To Location
Enter the Stock Location you want to set-up pricing for i.e. the Location to which goods are to be transferred to.
Transfer Margin %
Enter the ‘Transfer Margin Percentage’ that is to be applied to the cost of inventory items that are transferred to this Location. This is an optional field to two decimal places.
The ‘Margin’ is only applied to the issuing locations cost when no Price List is specified (at the next prompt), or if their is no price found for the Price List and Price Level for the Product in question.
Price List
Select the ‘Price List‘ to be employed in order to value goods transferred to the specified Location. This is an optional field. If you do not specify a Price List here, the transfer value used will be at cost (or cost + margin percentage – if a ‘Transfer Margin Percentage’ has been entered).
Price Level
Select the ‘Price Level‘ to use to value the goods being transferred to the specified Location. The options available are:
- Replacement Cost – use the replacement cost on the specified Price List as the transfer ‘price’ when transferring Products to the ‘transfer to’ Location.
- Standard Cost – use the standard cost on the specified Price List as the transfer ‘price’ when transferring Products to the ‘transfer to’ Location.
- Price Levels 1 to 5 – use the price for the matching Price Level on the specified price list ‘Standard Prices’ as the transfer ‘price’ when transferring Products to the ‘transfer to’ Location.
Use the ‘Add’ icon to add ‘Transfer Pricing’ details for a Location to the list.
Use the ‘Delete’ icon in order to remove ‘Transfer Pricing’ for a Location form the list.
In summary, the value of any individual ‘Stock Transfer’ order item is calculated using the steps below:
If the receiving Stock Location is not in the ‘Transfer Pricing’ list for the issuing Stock Location, then the Product is transferred at its cost value.
If the receiving Stock Location is found in the ‘Transfer Pricing’ list, the transfer ‘price’ is derived from the corresponding Price List and Price Level. Either Replacement Cost, Standard Cost or the Standard Price for the specified Price Level will be used based on the settings on the list.
If no Price List is specified (found), or the current price found is zero, the cost value is used, or the cost + margin% if a ‘Transfer Margin Percentage’ has been entered for the receiving Stock Location.